

PNW 3-Pot Starter Garden (Beginner Project You Can’t Mess Up)
If you’re new to Pacific Northwest gardening, this is the easiest way to go from “I have nothing” to “I have plants that are actually thriving.”
No raised beds. No complicated pruning. No fancy gear.
Just three pots, the right soil, and a simple watering rhythm that works with our cool springs and dry summers.
By the end, you’ll have:
1 pot you can harvest from (herbs)
1 pot that brings life (pollinators)
1 pot that looks good in shade (foliage + structure)
And once you’ve done this, everything else feels less intimidating.
“If you can keep three pots alive, you can grow a garden.”
Quick overview (what you’re making)
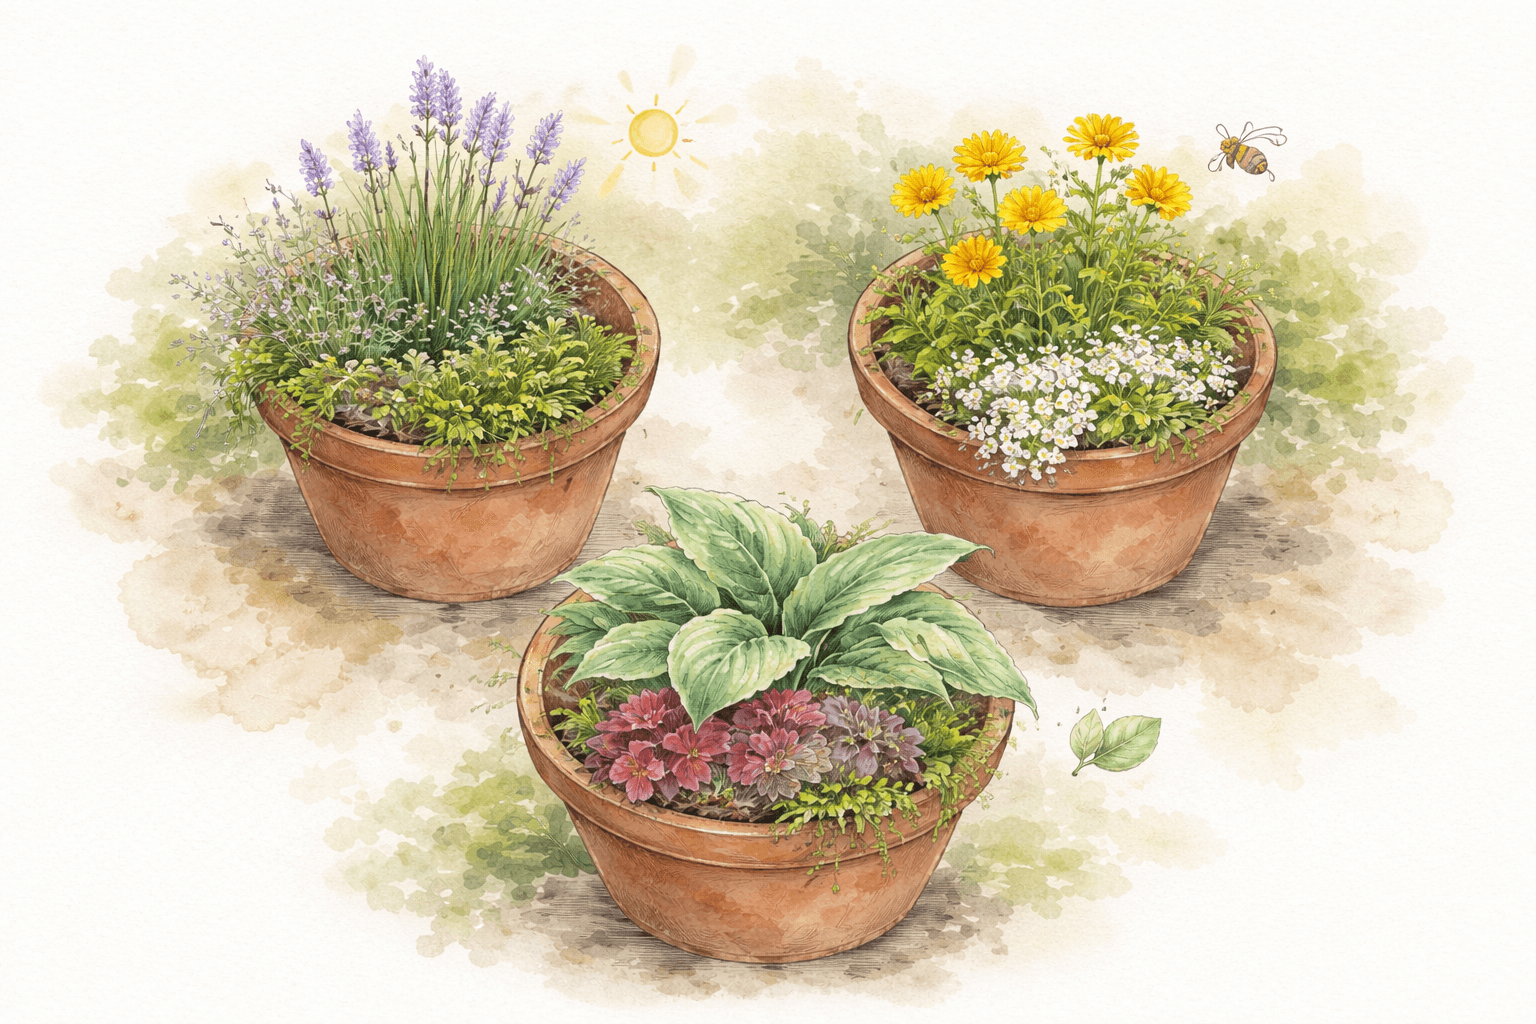
Pot 1: The “Kitchen Herbs” Pot (sun / part sun)
Low effort, high reward, and you can actually use it.
Plants: Chives + Thyme + Oregano
Chives = easiest “I can’t kill this” herb
Thyme = loves sun, doesn’t need much water
Oregano = spreads, tough, and blooms for pollinators if you let it flower
Pot 2: The “Pollinator Pot” (sun / part sun)
Fast blooms + constant activity.
Plants: Sweet Alyssum + Calendula (or Cosmos)
Sweet alyssum = the easiest flowering filler
Calendula = cheerful, easy, long blooming (cosmos is also great)
Pot 3: The “Shade Saver” Pot (shade / part shade)
This pot is for the reality of PNW gardens: shade and damp.
Plants (choose one combo):
Option A (most foolproof): Hosta + Heuchera
Option B (more “PNW woodland”): Western Sword Fern + Hellebore
Option C (small + tidy): Heuchera + Autumn Fern
Shade & Dappled Light Collection
Shopping list (buy exactly this)
Pots + soil
3 pots, 10–12 inch diameter (each must have drainage holes)
3 matching saucers (optional, but helpful)
1–2 bags potting mix (look for “container/potting mix,” not garden soil)
Optional but nice: a small bag of compost (mix 20% compost into potting mix)
Tools (minimal)
Small hand trowel (or a big spoon works)
Gloves (optional)
Watering can OR a hose with a gentle sprayer
Add-ons (optional but beginner-friendly)
Feed the soil gently.
A bag of bark mulch (just a thin top layer reduces drying in summer)
What Soil Should I Buy?
Use a high-quality organic potting mix for containers (not garden soil).
Good PNW options:
G&B Organics Potting Soil
FoxFarm Ocean Forest
Whitney Farms Organic Potting Mix
Cedar Grove Potting Mix
If it feels light and fluffy when dry, you’re good.
Step 1: Pick your “light level” (30 seconds)
Stand where the pots will go and decide:
Full sun: 6+ hours of direct sun
Part sun / part shade: 3–6 hours
Shade: under trees / north side / only a little morning light
If you’re not sure:
morning sun counts, afternoon sun is stronger.
When in doubt, choose plants that tolerate part shade.
Step 2: Set up the pots (10 minutes)
Put the pots where they’ll live.
(When pots are full of wet soil, they get heavy.)
If your pots have huge drainage holes, cover them with:
a small piece of mesh, or
a flat rock, or
a scrap of weed cloth
Don’t block drainage — just stop soil from washing out.
Fill each pot with potting mix to about 2 inches below the rim.
Water the soil once to “settle” it.
(So it doesn’t collapse later and bury your plants too deep.)
Step 3: Plant each pot (this is the foolproof method)
The golden rule
Don’t plant deeper than the plant is already sitting in its nursery pot.
Most beginner plant deaths come from planting too deep + soggy soil.
Pot 1: Herbs (Chives + Thyme + Oregano)
Spacing idea: triangle layout
Take the plants out of their nursery pots.
If roots are tightly circling, gently loosen the bottom with your fingers.
Place them:
Chives near the center
Thyme near an edge (it can trail)
Oregano opposite edge (it spreads)
Backfill soil, press gently, water.
Pot 2: Pollinator Pot (Sweet Alyssum + Calendula OR Cosmos)
If you want the simplest version: Sweet alyssum + calendula
Put calendula/cosmos in the center (it’s your “taller feature”)
Plant sweet alyssum around the edge as a living border
Water in
This pot will look a little sparse at first… and then suddenly it fills in.
Pot 3: Shade Saver Pot (pick one combo)
Option A (easiest): Hosta + Heuchera
Hosta = big leaves, forgiving
Heuchera = color, evergreen-ish, hardy
Plant hosta center/back, heuchera near edge.
Option B (woodland vibe): Sword Fern + Hellebore
Fern for structure, hellebore for winter/spring magic.
Step 4: Watering plan (the part that makes this succeed)
Week 1–2 (establishing)
Check daily
Water when the top 1 inch feels dry
Week 3–6
2–3 times per week depending on weather
In hot weeks, you might water more often
“Containers dry out faster than ground soil — that’s the only rule you really need to remember.”
Summer rule (PNW dry season)
Containers dry out faster than ground soil.
If temps jump, your pots may need water every day or every other day.
How to tell if it’s time:
Stick a finger in the soil. If it’s dry down to your first knuckle, water.
Step 5: The “do I need fertilizer?” answer
Not right away.
Good potting mix already contains nutrients.
But after 4–6 weeks, container plants benefit from a gentle boost.
Instead of synthetic fertilizers, choose:
Organic granular fertilizer
Worm castings mixed into the top layer
A diluted organic liquid feed
Think of it as feeding the soil, not forcing the plant.
I don’t use synthetic fertilizers like Miracle-Gro in my garden. Slow, organic feeding builds healthier soil and more resilient plants over time.
What success looks like (so you don’t second-guess)
Herbs pot:
Chives stand up and get taller
Thyme stays compact but looks perky
Oregano starts to spread sideways
Pollinator pot:
Sweet alyssum starts filling the edges
Calendula/cosmos starts pushing buds
You’ll see bees first, then more life
Shade pot:
Slow and steady growth
Leaves look firm, not limp
Shade plants don’t “explode” — they settle in
Troubleshooting (read this before you panic)
- “My plant looks droopy”
Usually water stress.
- droopy + dry soil = water
- droopy + wet soil = too much water / poor drainage
- “Leaves are yellowing”
Often overwatering in cool weather. Let the pot dry a bit between waterings.
- “Something is chewing my hosta”
That’s slugs. Welcome to the PNW.
- go out at dusk and remove them (gross but effective)
- keep mulch away from the crown
- read about slug control techniques
- “My pot looks empty”
Totally normal in week 1–2. By week 3–6, it looks like a garden.
Related reads
A few more posts that pair well with this one.
Garden Mistakes I Still Make Every June
→Even experienced gardeners make mistakes. Here are the common June gardening mistakes I still catch myself making in the Pacific Northwest—and what I'm trying to do differently.
Understanding Your Garden Space
→Learn how to read your garden space — understanding sun, shade, soil, and microclimates in the Pacific Northwest before you plant.
What to Deadhead in June (And What to Leave Alone)
→Not sure which flowers to deadhead in June? Learn what to trim, what to leave alone, and how deadheading can keep your garden blooming longer in the Pacific Northwest.
Not finding the answers?
Have a gardening question or topic you'd like me to write about? Send a request and I'll see what I can dig up.
Enjoying this post?
If you love the whimsy and want to support more PNW garden guides, you can buy me a coffee.
🌼 Buy Me a Coffee